Julia Setup via juliaup
1 Windows Users
Go to Microsoft App store and Install Julia App.
Download and Install VS Code.
Install the Julia VS Code Extension.
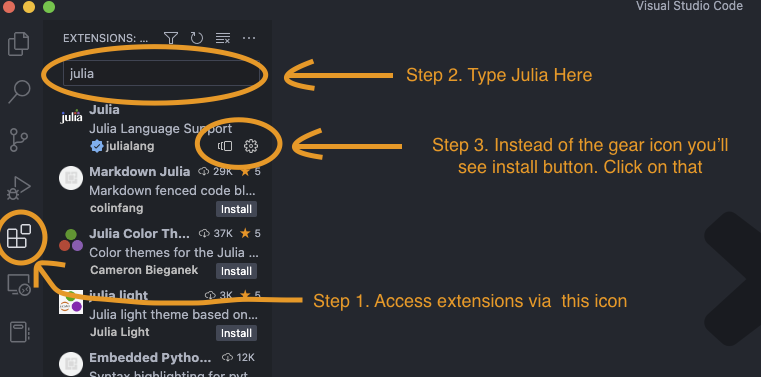
After installation, the “install button” will turn into a gear icon. Once you click on the gear icon, a dropdown menu will popup. From that list, choose
Extension Settings.Without unselecting the text on the extension search bar, type
exe. Make sure theJulia: Executable Pathfield is completely blank.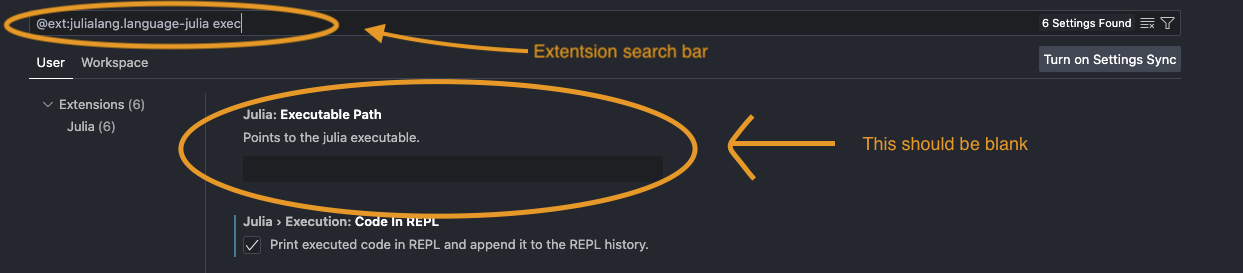
To start a Julia session inside VS Code, press
Ctrl+Shift+P. From the dropdown list, chooseJulia: Start REPLIf you want to start Julia REPL without VS Code, you go to your command line and type
juliaand hit enter.
1.1 UnderstandingJuliaup
Juliaup is a Julia version manager and is automatically installed when you install the Julia App from Microsoft App Store. Juliaup lets you add, update, and remove different Julia versions very easily.
To use juliaup, you open your command line and type juliaup and the command you want to run.
juliaup statusprints all the julia version installed in your PC.juliaup add releaseinstalled the latest stable version of Julia.juliaup add 1.8.3will install Julia 1.8.3.- To see the list of available julia version, run
juliaup list
- To see the list of available julia version, run
juliaup default 1.8.3sets the default version of Julia in your PC as Julia 1.8.3. This also defines what version of Julia will be called while you start a Julia session in VS Code.juliaup remove 1.8.3will remove Julia 1.8.3 from your PC.
2 Mac User
- Install homebrew package manager for Mac
To install homebrew, you can copy-past and run the below code on your terminal:
/bin/bash -c "$(curl -fsSL https://raw.githubusercontent.com/Homebrew/install/HEAD/install.sh)"- Install
Juliaupvia homebrew
Run the following code in your terminal:
brew install juliaup- Follow instructions in Section 1.1 to install/remove a particular version of Julia.